
|
Size: 2039
Comment:
|
Size: 2755
Comment:
|
| Deletions are marked like this. | Additions are marked like this. |
| Line 21: | Line 21: |
| === Elog posts === * [[https://nodus.ligo.caltech.edu:8081/40m/16410|40m/16410: Vent Started/Completed]] |
|
| Line 27: | Line 32: |
| 1. [[https://nodus.ligo.caltech.edu:8081/40m/16432|40m/16432: Removal of PR2 mirror]] 2. Placing a fixed mirror on a new PR2 location. 3. Replacing PR3 with SOS with new optic ([[https://dcc.ligo.org/LIGO-E1800089|E1800089]]). 4. Aligning TT2, PR2 and PR3 to get beam to BS center. 5. Set up 2-3 irises. 6. Put in PR2 in SOS. 7. Align the beams back to the irises. |
|
| Line 28: | Line 41: |
| 1. Clear East side of BS table. Following optics need to be removed: * OM4-PJ * GRX_SM1 * OM3 * BSOL1 |
|
| Line 29: | Line 47: |
| == Part V: LO Path up to LO2 setup == | == Part V: SRM Oplev setup == |
| Line 31: | Line 49: |
| == Part : AS Path setup == | == Part VI: POY Path setup == |
| Line 33: | Line 51: |
| == Part : BS Path setup == | == Part VII: LO Path up to LO2 setup == |
| Line 35: | Line 53: |
| == Part : POP Path setup == | == Part VIII: AS Path setup == |
| Line 37: | Line 55: |
| == Part : POX Path setup == | * Clear the ITMY table. Following optics need to be removed: * POYM1 * ITMY OL1 * ITMY OL2 ... |
| Line 39: | Line 61: |
| == Part : POY Path setup == | |
| Line 41: | Line 62: |
| == Part : AS RFPD Path setup == | == Part IX: BHDBS Path setup == |
| Line 43: | Line 64: |
| == Part : Green transmission paths == | * Setting up LO3, LO4, BHDBS |
| Line 45: | Line 66: |
| == Part : ITMX oplevs == | == Part X: POP Path setup == == Part XI: POX Path setup == == Part XII: AS RFPD Path setup == == Part XIII: Green transmission paths == == Part XIV: ITMX oplevs == |
| Line 49: | Line 78: |
| == Part : ITMY oplevs == | == Part XV: ITMY oplevs == |
| Line 51: | Line 80: |
| == Part : BS, PRM SRM oplevs == | == Part XVI: Place PRM and SRM == |
| Line 53: | Line 82: |
| == Part : Place PRM and SRM == | == Part XVII: BS, PRM oplevs == |
| Line 55: | Line 84: |
| == Part : Pre-pump alignment and clearance check == | == Part XVIII: Pre-pump alignment and clearance check == |
| Line 58: | Line 87: |
== Elog posts == * [[https://nodus.ligo.caltech.edu:8081/40m/16410|40m/16410: Vent Started/Completed]] |
BHR Upgrade Phase I - Vent of Fall 2021
1. Venting process
Mon Oct 18th, 2021
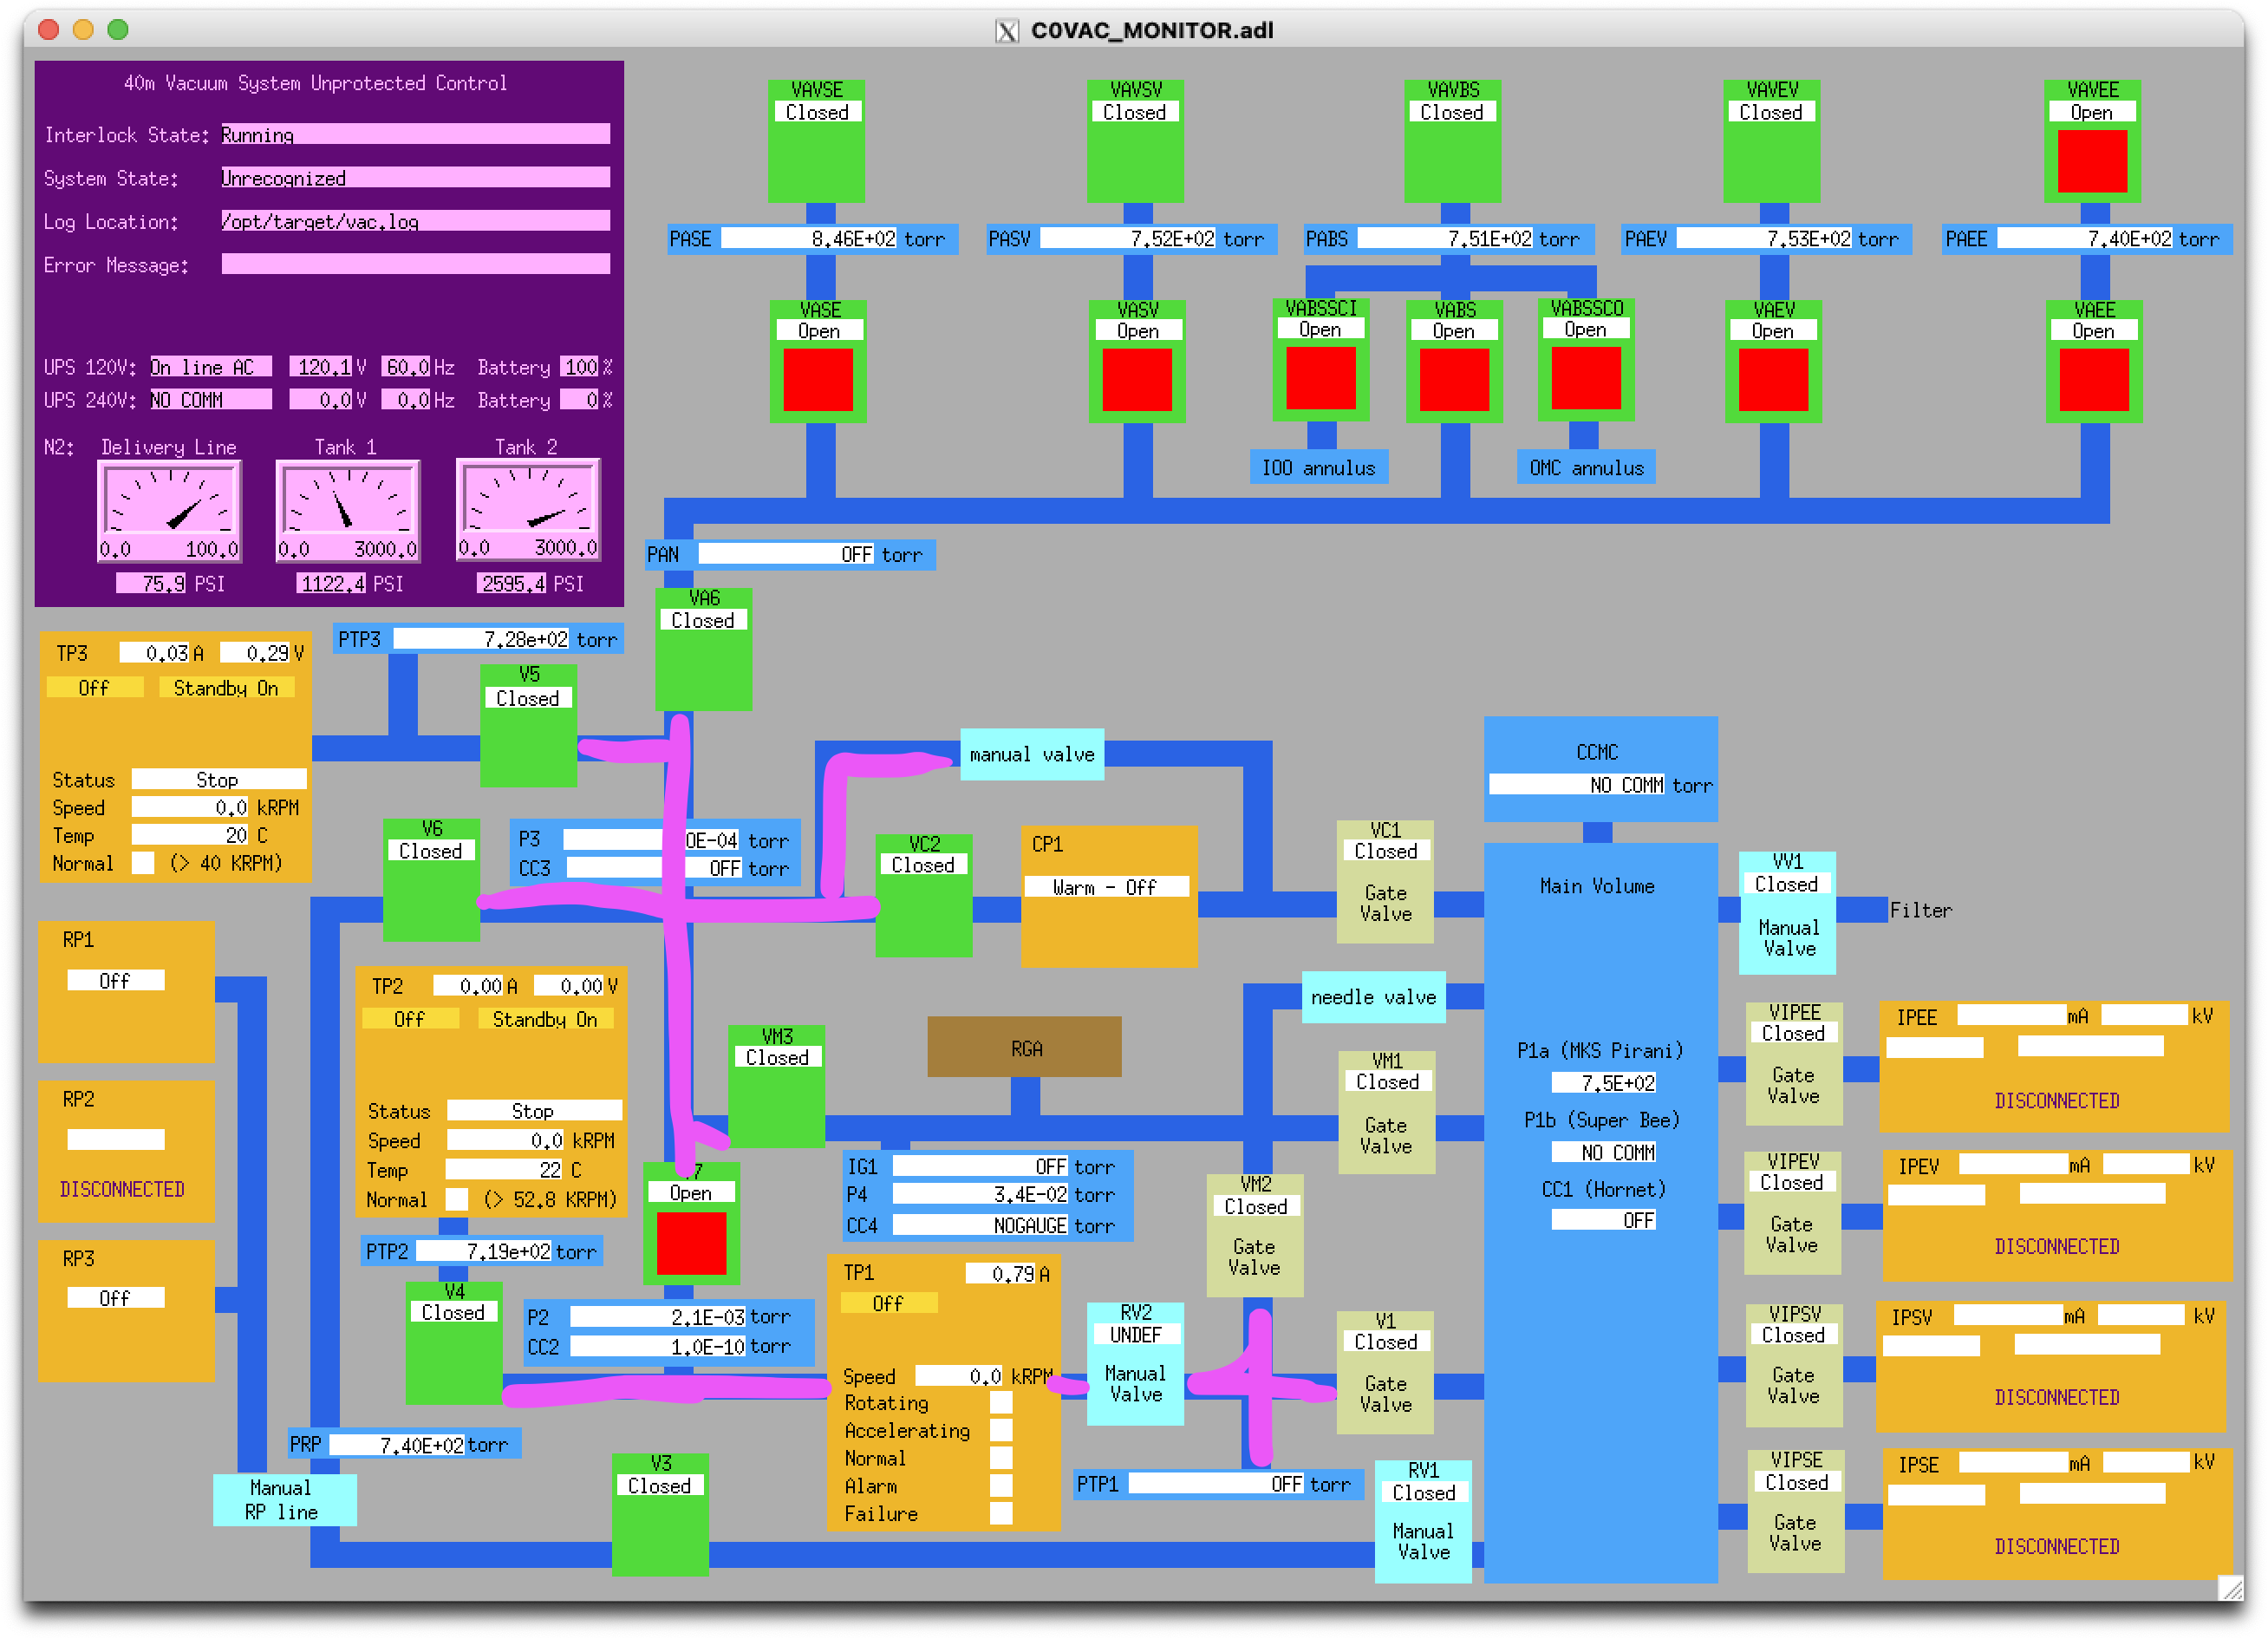
- Checked the main volume is isolated.
- TP1 and TP2 were made isolated from other volumes. Stopped TP1. Closed V4 to isolate TP1 from TP2.
- TP3 was made isolated. TP3 was stopped.
- We wanted to vent annuli, but it was not allowed as VA6 was open. We closed VA6 and vented the annuli with VAVEE.
- We wanted to vent the volume between VA6, V5, VM3, V7 together with TP1. So V7 was opened. This did not change the TP1 pressure (P2 = 1.7mmTorr) .
- We wanted to connect the TP1 volume with the main volume. But this was not allowed as TP1 was not rotating. We will vent TP1 through TP2 once the vent of the main volume is done.
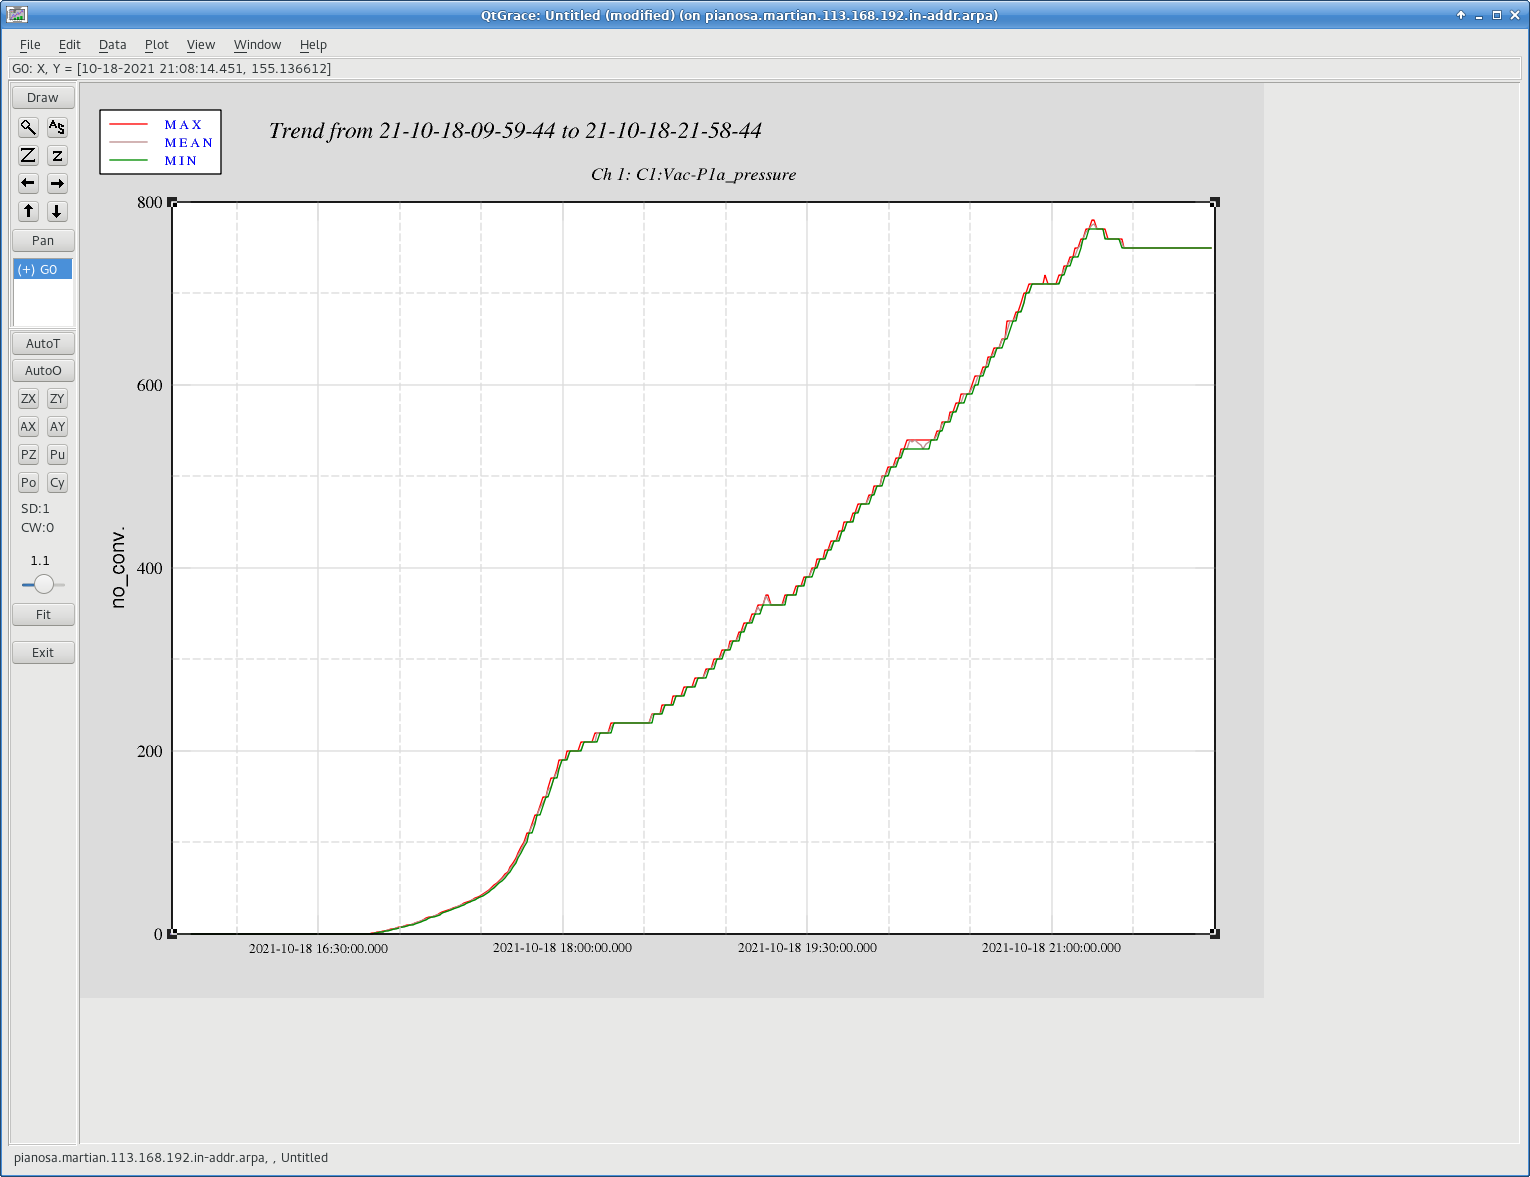
- Started venting the main volume@Oct 18, 2021 9:45AM PDT
- We started from 10mTorr/min, and increased the vent speed to 200mTorr/min, 700mTorr/min, and now it is 1Torr/min @ 20Torr
- 280Torr @11:50AM
- 1atm @~2PM
We wanted to vent TP1. We rerun the TP2 and tried to slowly introduce the air via TP2. But the interlock prevents the action.
1.1. Elog posts
2. Part I: Optics removal on westside of BS Table
3. Part II: Relocation of TT2 and MMT1/2 alignment to TT2
4. Part III: PRC Folding mirror placement
- Placing a fixed mirror on a new PR2 location.
Replacing PR3 with SOS with new optic (E1800089).
- Aligning TT2, PR2 and PR3 to get beam to BS center.
- Set up 2-3 irises.
- Put in PR2 in SOS.
- Align the beams back to the irises.
5. Part IV: SR3 replacement
- Clear East side of BS table. Following optics need to be removed:
- OM4-PJ
- GRX_SM1
- OM3
- BSOL1
6. Part V: SRM Oplev setup
7. Part VI: POY Path setup
8. Part VII: LO Path up to LO2 setup
9. Part VIII: AS Path setup
- Clear the ITMY table. Following optics need to be removed:
- POYM1
- ITMY OL1
- ITMY OL2
- ..
10. Part IX: BHDBS Path setup
- Setting up LO3, LO4, BHDBS
11. Part X: POP Path setup
12. Part XI: POX Path setup
13. Part XII: AS RFPD Path setup
14. Part XIII: Green transmission paths
15. Part XIV: ITMX oplevs
Can we push the mirrors back to keep more clearance?
16. Part XV: ITMY oplevs
17. Part XVI: Place PRM and SRM
18. Part XVII: BS, PRM oplevs
19. Part XVIII: Pre-pump alignment and clearance check